From QR Code to Signed Proof: One-Time Pairing, Nonce, and Device Signature
Two QR codes, institution-and-session-bound pairing, Secure Enclave signatures, pinned template revisions and SoftHSM-signed disclosure results, step by step.
The most critical moment in a digital identity wallet is when the organization’s request and the citizen’s consent are securely linked. Even though only a QR code appears on the screen, the following questions must be resolved behind the scenes:
- Is the institution sending the request to the correct wallet?
- Did the wallet scan the QR code for the correct institution and the correct transaction?
- Can a previous presentation be reused?
- Which fields did the user approve?
- Did the presentation actually come from a registered device?
In this part of the series, I’m examining the end-to-end flow in the local digital ID demo, why two different QR codes are used, and what cryptographic mechanisms protect the sharing process.
Summary of the workflow
1. Cüzdan geçici eşleştirme QR/kodu üretir
2. Kurum kodu tek sefer tüketir
3. Kurum, eşleştirilmiş cüzdana talep gönderir
4. Cüzdan bildirimde kurum ve amacı gösterir
5. Kullanıcı kurumun işlem QR'ını okutur
6. Cüzdan alanları gösterir ve cihaz doğrulaması ister
7. Cihaz talep + nonce + seçilen alanları imzalar
8. Sunucu belgeyi, cihaz imzasını ve talep kapsamını doğrular
9. Kuruma kısa ömürlü, hedefe bağlı imzalı sonuç döner
10. Cüzdana işlem makbuzu yazılır
First QR Code: To Find the Wallet, Not to Share Data
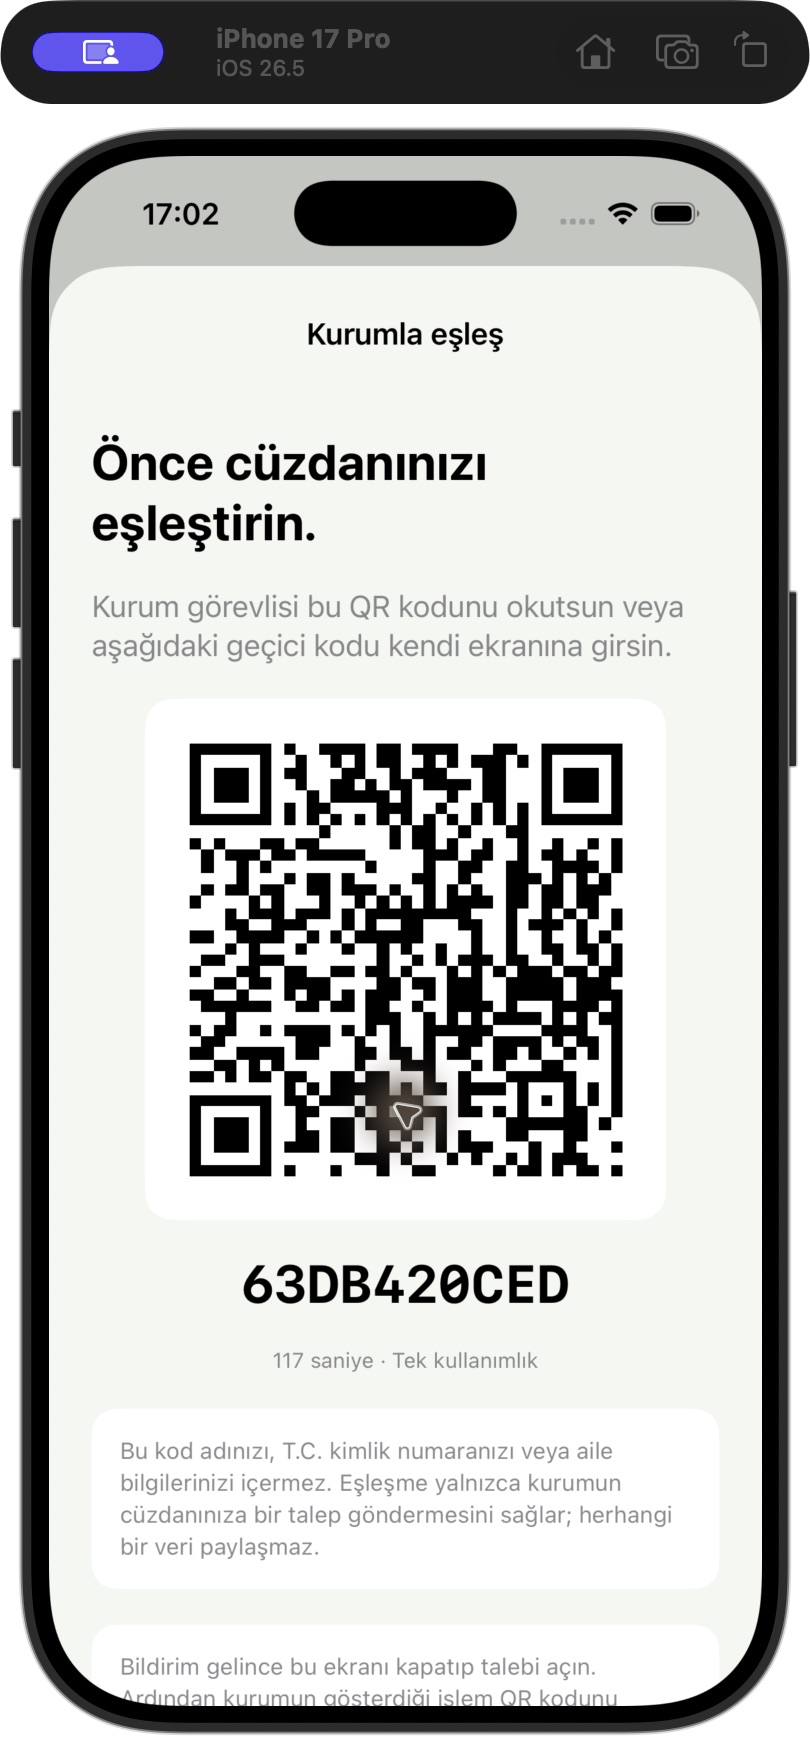
The institution portal does not search for a citizen’s name or Turkish ID number. Instead, the wallet generates a one-time, opaque pairing token valid for 2 minutes. The institution can scan the QR code or enter the 10-character temporary code.
The first QR code temporarily identifies the wallet. It does not contain a name, ID number, or family information, and it does not share any data. Screenshot from the initial revision.
Instead of storing the raw token, the server keeps the SHA-256 hash in memory. When a new code is generated, any previous unused code associated with the same wallet becomes invalid. When an institution uses the code, it receives a short-lived token that allows it to make only a single request within that institution connectionToken .
token = randomBytes(32)
code  = randomHex(5)       // 10 karakter

store[SHA256(token)] = {
  wallet: person,
  code,
  expiresAt: now + 120s
}
The connection response reveals neither a permanent wallet identifier nor the person’s name. Its token is bound to the institution and the initiating session, and cannot be reused in another institution, session or second request.
Why is a second QR code needed?
The first QR code simply states, “You can send a request to this institution.” However, the citizen opening the notification should not, by itself, grant sharing permission. Otherwise, a request from a malicious institution or one displayed on the wrong screen could be moved into the approval workflow without the user noticing.
For this reason, after creating a request, the institution generates a second, transaction-specific QR code. The wallet verifies that the user opening the notification has scanned the QR code for that exact request. The random sequence within the QR code is not found in the notification, the inbox, or a standard request response.
request = {
  id: UUID,
  recipient: matchedWallet,
  merchant: verifierId,
  nonce: UUID,
  qrHash: SHA256(randomQrSecret),
  expiresAt: now + 5min,
  status: "pending"
}
The wallet rejects QR codes associated with the wrong request, requests sent to a different wallet, and corrupted QR codes. The QR code generated upon successful matching pairingToken can only be used for the relevant request.
Why doesn’t the notification mean the request has been shared?
While the native iOS app is open, it checks for incoming requests every 3 seconds and generates a local notification. The notification’s content is kept general; the address, family member, or value to be shared is not displayed on the lock screen.
When the notification is tapped, the wallet displays the institution’s name and purpose, then directs the user to the second QR code on the institution screen. Since APNs are not implemented in this version, no push notifications are sent while the app is closed; requests that have not expired can be retrieved when the app is reopened.
Field-Based Consent
After QR code pairing, the user sees the requested fields one by one. For example, a delivery scenario might request the state, county, full address, and ZIP code. The user can remove the full address and select only the state and county. The server performs three separate checks:
- The selection list cannot be empty; if the user does not wish to provide any information, they must reject the request.
- The same field cannot be submitted twice.
- Each selected field must fall within the organization’s request scope.
This final check is critical. A field hidden in the interface could be added to the API request by a modified client. Security decisions must always be re-verified on the server.
Face ID is the authentication; the device signature is the cryptographic bond
When the user taps “Verify and Share,” the iOS app deviceOwnerAuthentication executes the policy. According to Apple’s definition, this policy may use biometrics or, if biometrics are unavailable, the device passcode.
After successful device owner authentication, the app signs the following challenge value with the P-256 device key:
challenge = [
  requestId,
  nonce,
  personId,
  selectedClaims.sort().join(",")
].join("|")
On a real iPhone, the private key is generated within the Secure Enclave and is not exposed externally. Since the Simulator lacks a Secure Enclave, a Keychain-based software key is used. The server records the public key, verifies the device signature, and includes only device_verified: true the result to the proof sent to the organization; the fixed device ID is not provided to the verifier.
Apple’s Secure Enclave documentation states that the hardware-based key manager is isolated from the main processor and that the application can perform a signature operation without processing the private key in the clear. However, in the prototype, device registration is not tied to real-person identity verification; therefore, the device signature simply means “this demo wallet was signed with the same key” and does not imply government-level identity assurance.
Linking the presentation to the verifier and processing
Two fields in the presentation are particularly critical:
audience: Specifies for which institution the proof was generated.nonce: Links the proof to a specific verification process.
OpenID for Verifiable Presentations 1.0 links the presentation’s target client_id and the transaction nonce value, and requires the verifier to validate this link as a mandatory security check. Although the demo does not implement the OpenID4VP protocol, it illustrates the same security principle in a simplified flow.
{
  "issuer": "Yerel Demo Nüfus Kurumu",
  "audience": "social",
  "nonce": "işleme-özel-değer",
  "request_id": "talep-kimliği",
  "family_members": [
    { "name": "Sentetik Kişi", "relation": "Eş" }
  ],
  "device_verified": true,
  "expires_at": 1792331073709,
  "pairwise_id": "kuruma-ozel-tanimlayici"
}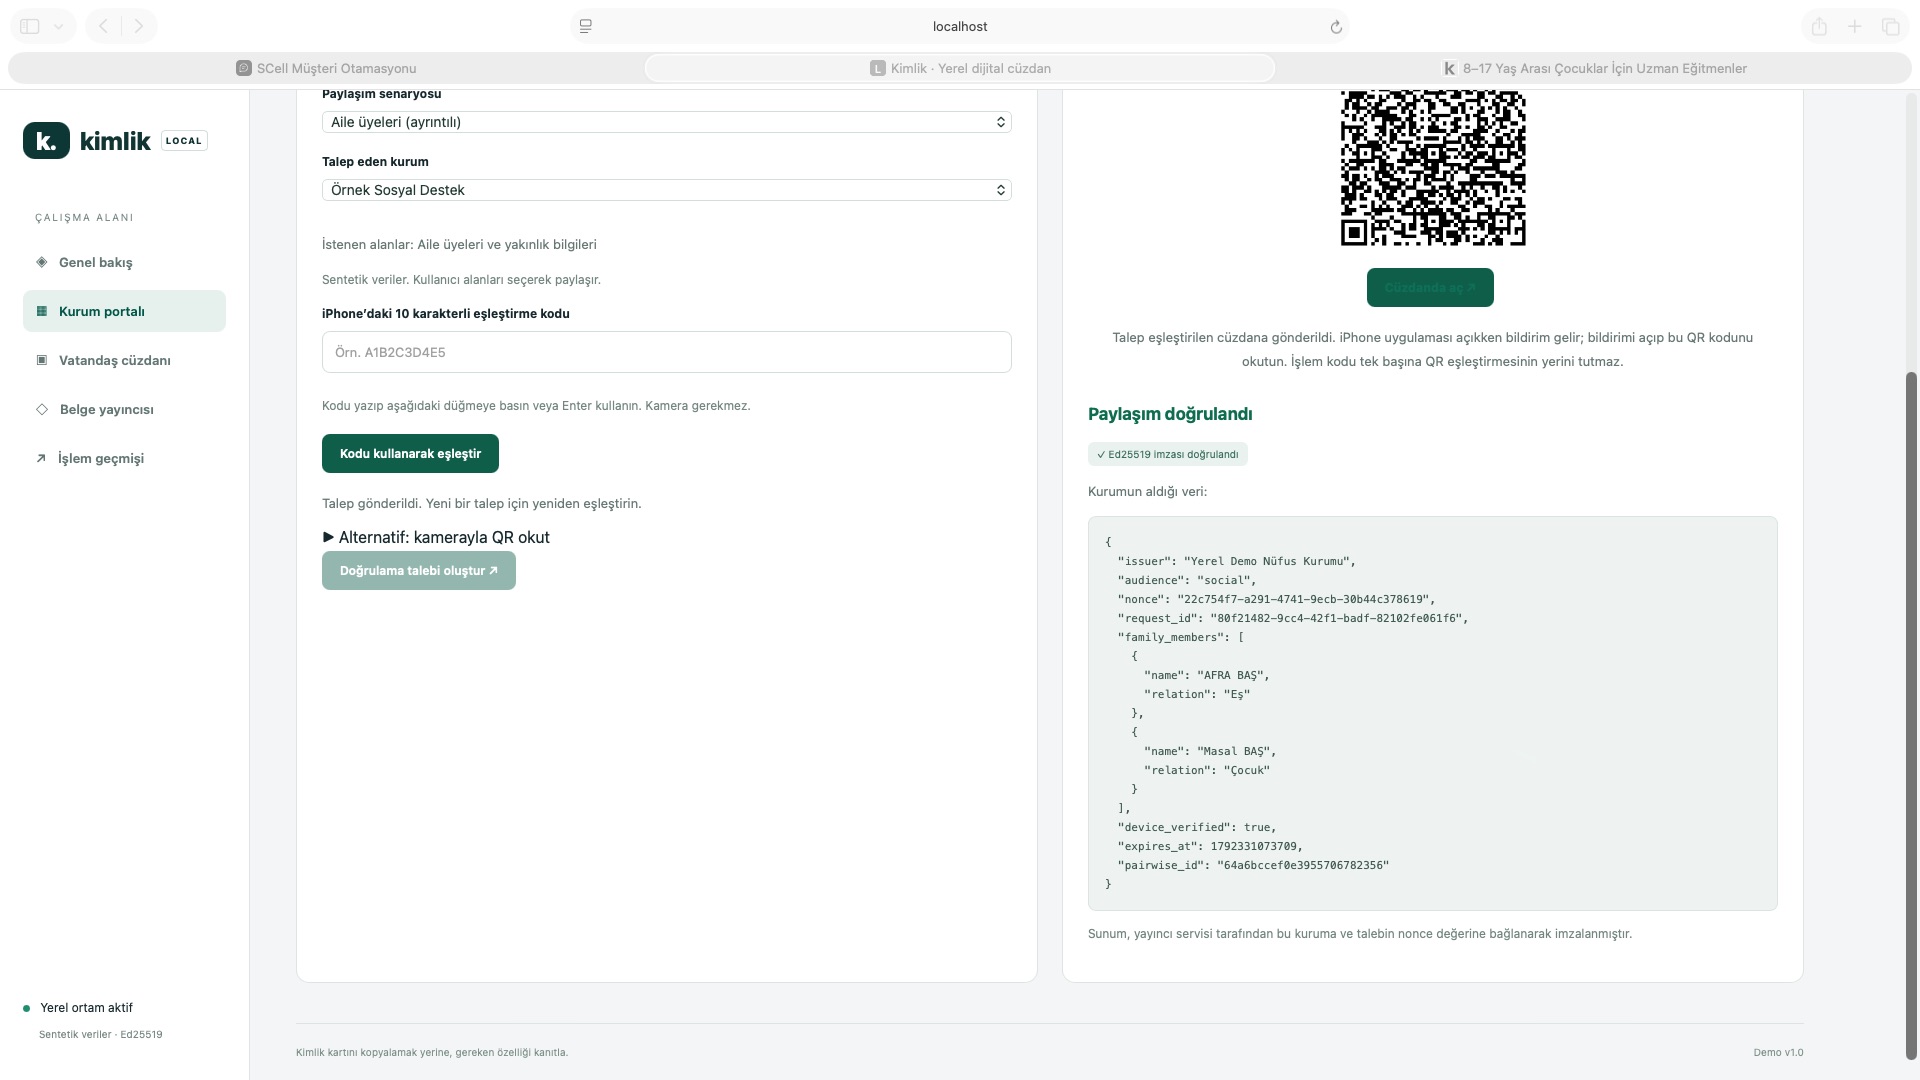
The verifier receives only the selected fields, transaction bindings, and the signature verification result. Screenshot from the initial revision.
Single-use and state machine
Each request pending starts in a state and can transition to only one terminal state:
pending → approved
pending → incomplete
pending → ineligible
pending → rejected
pending → expired
An approved or rejected request cannot be resubmitted. The wallet pairing code, organization link token, transaction QR secret, and pairing token are used for different purposes and are not interchangeable. This distinction prevents too much authority from being loaded onto a single long-lived QR code.
Visible security for the user
Even if the cryptography is correct, the system fails to achieve its purpose if the user sends the wrong information to the wrong institution. For this reason, security decisions in the prototype are also made visible in the user interface:
- The institution and purpose are displayed at the top of the confirmation screen.
- The actual demo values of the fields can be viewed before sharing.
- A countdown showing the remaining time for the request is displayed.
- The “Reject” option is located on the same screen as the “Confirm” button.
- After sharing, the fields that were sent are listed on the receipt.
The result of this development phase
The two-QR-code approach slightly lengthens the flow; however, it separates two distinct security questions: “To which wallet should I send the request?” and “Which transaction is the user currently approving?” One of the most valuable lessons from the prototype is that it is safer to place friction at the right point in the identity flow rather than removing it entirely.
In the third part of this series, we’ll examine what the 22 tests proved, the prototype’s trust boundaries, and how this lab can be moved to production with OpenID4VCI, OpenID4VP, real credential formats, HSM, trust logs, and an independent security assessment.
The institution session is part of the transaction
Redeeming the temporary wallet code now binds the connection to both the institution and its initiating session. Institution identity comes from the authenticated account’s server-side record, not an arbitrary client-supplied name. A market account—or a newly opened hospital session—cannot continue an earlier hospital connection. Unauthorized attempts receive HTTP 403 with an explanatory reason.
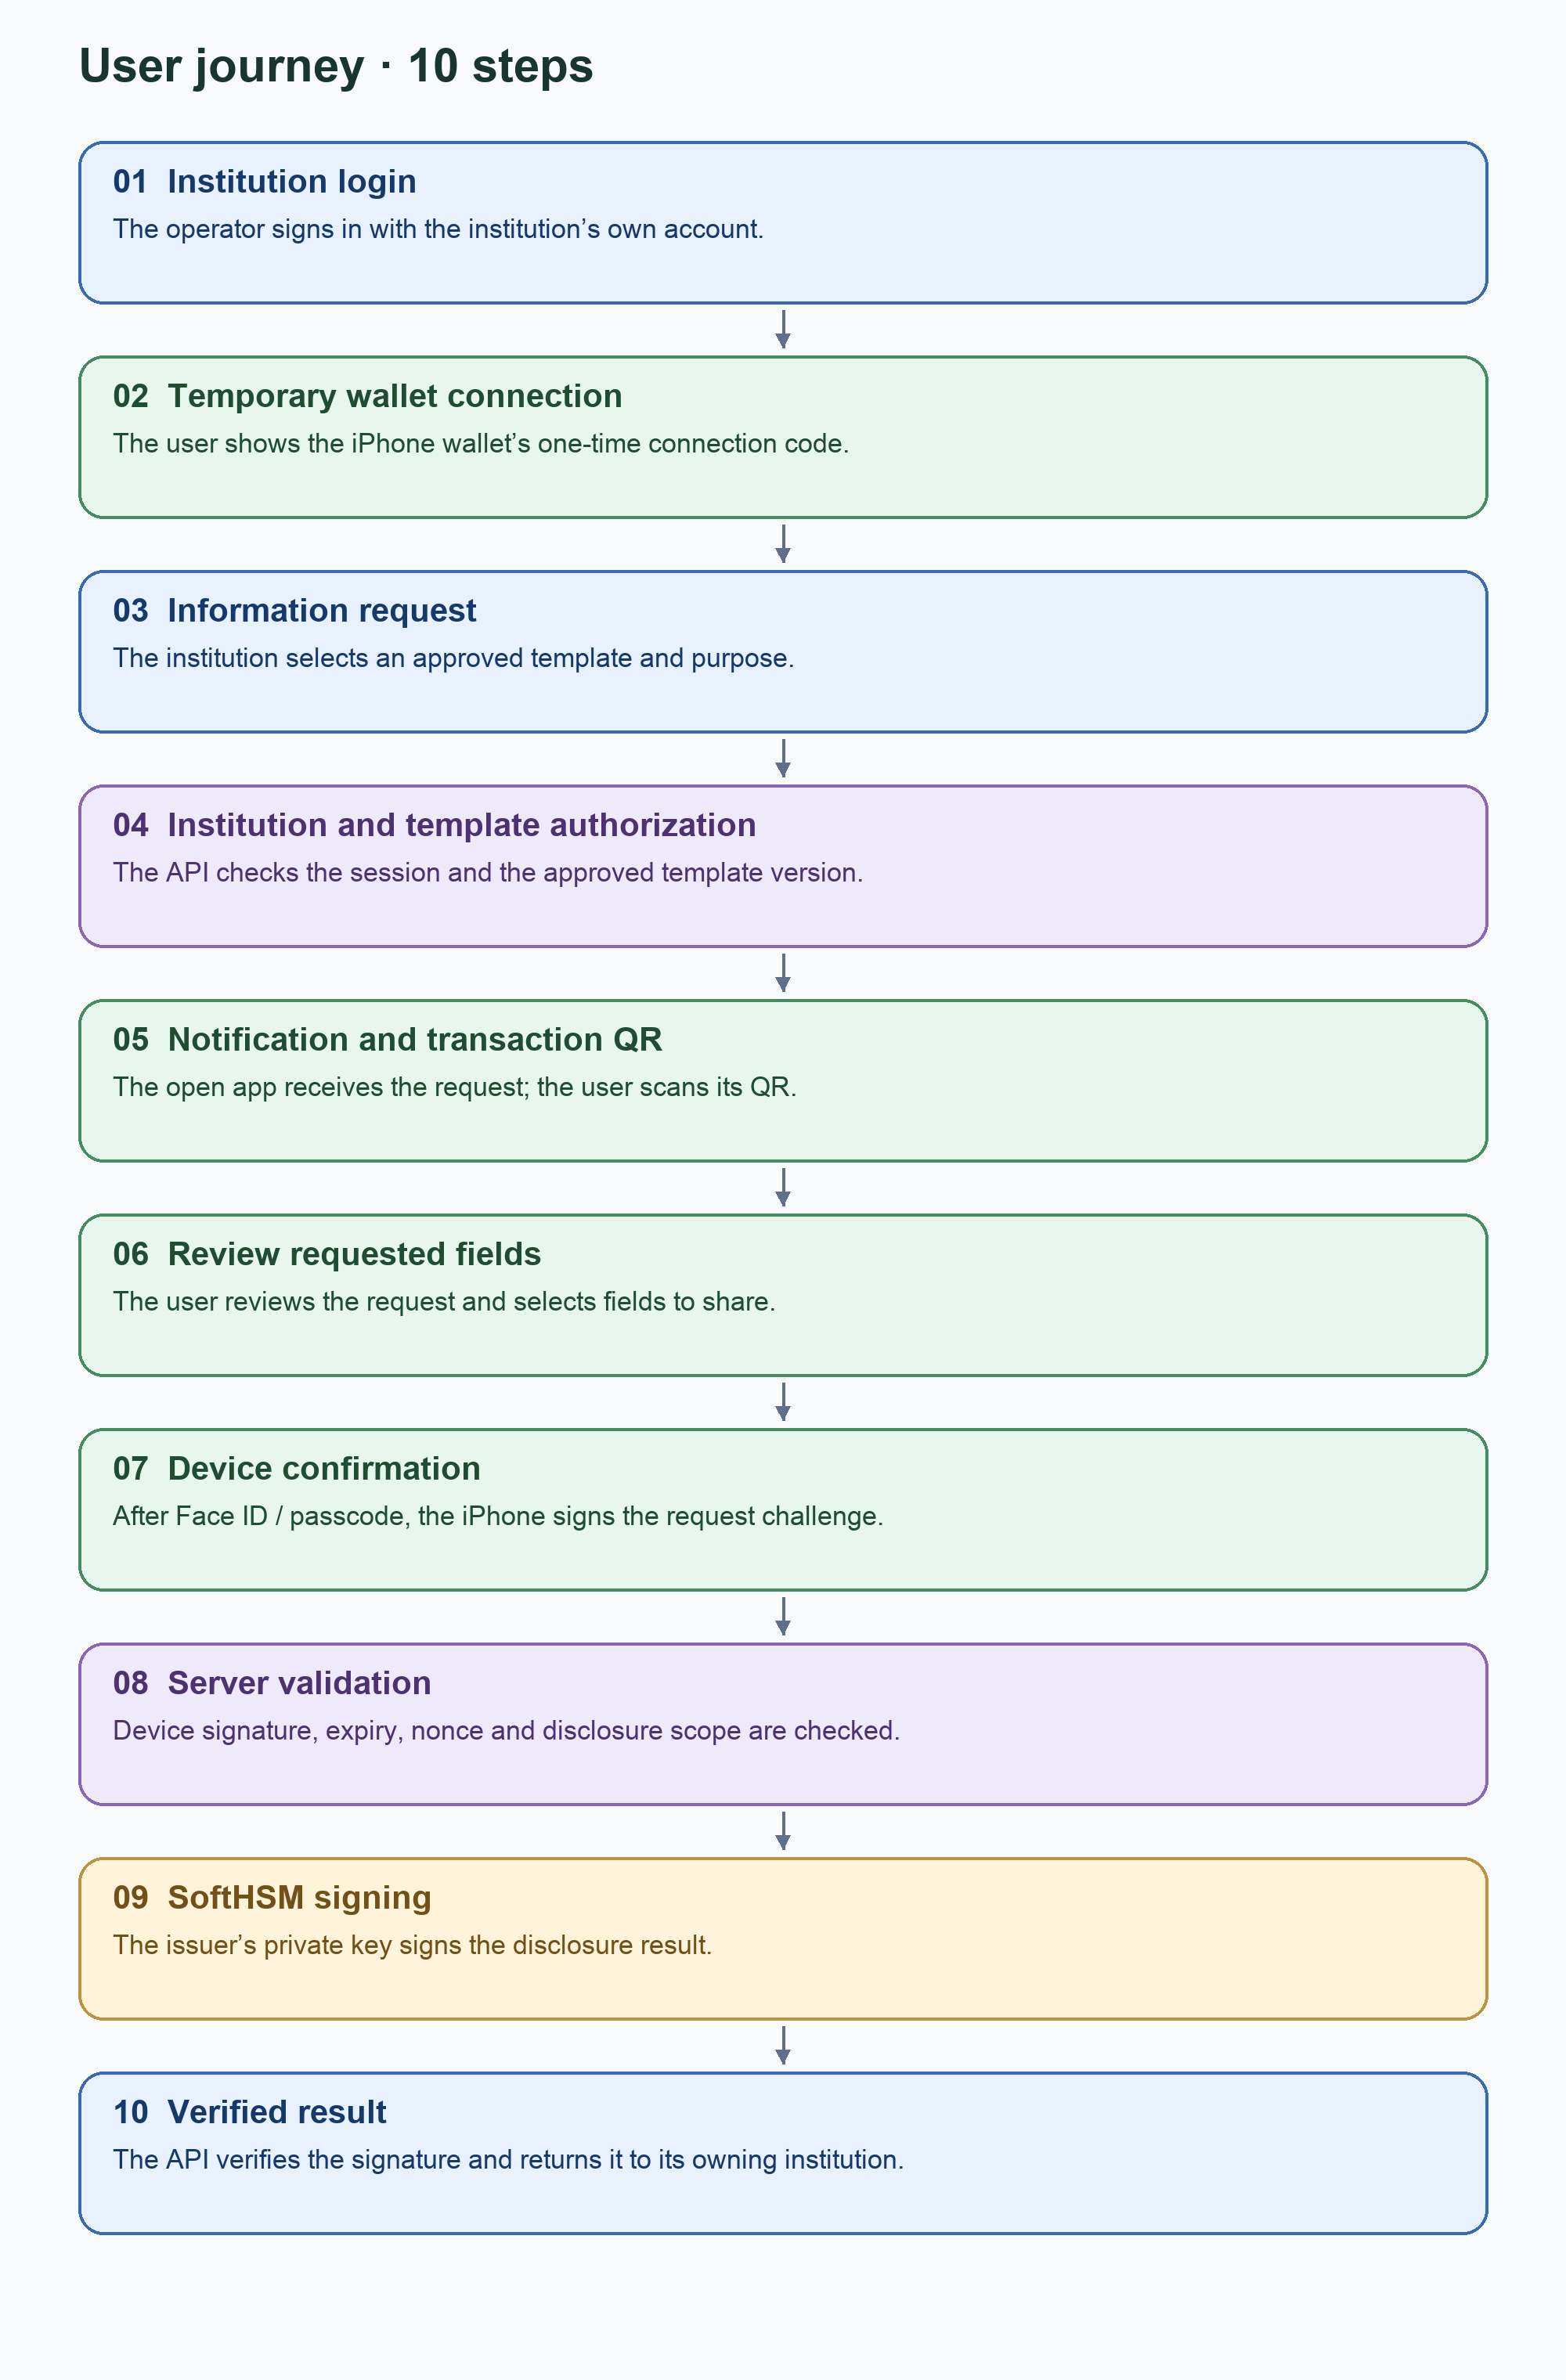
User journey: ten ordered steps from institution login to the SoftHSM-signed result.
Pin the template revision to the request
For dynamic institutions, the purpose, fields, requirements and template version are fixed when the request is created. If phone is optional in v1 and required in v2, an existing v1 request still completes under its original rules. The signed result includes template_id and template_version. Editing a template cannot retroactively change what the user was asked to approve.
Two separate signatures and verification steps
The iPhone signature binds the request identifier, nonce, synthetic person selection and sorted field names. The API verifies it with the registered device public key. Following credential and policy checks, the selected disclosure is signed using ES256 with the SoftHSM issuer key. The API then verifies the returned signature with the issuer public key. “Signature verified” on the institution screen reports this central verification; it does not mean that each institution runs an independent verification server.
If the signer is unavailable, signing and health checks fail with 503. There is no silent fallback to a development key. SoftHSM provides a software signing boundary for testing, not the physical protection of a hardware HSM.
Withholding required fields produces incomplete; failing a requested eligibility condition produces ineligible. Selected information may already have been disclosed in either case: an incomplete transaction does not mean that no data was shared. Explicit rejection performs no disclosure.
Resources
Standards and primary sources
Use the current editions and your organization’s approved policies when implementing production systems.
How would you rate this article?
Your feedback helps improve future articles.